
Saving the Luan: A Guide to Restoring Mid-Century Mahogany Paneling (Without Painting It)
Mid-century modern (MCM) homes are famous for their warm mahogany (lauan/“luan”) paneling, clean lines, and honest materials. If yours still has original veneer walls, you’re sitting on one of the most irreplaceable design features of the era.
A growing movement among mid-century modern homeowners and preservationists champions restoration—not paint—of original wood paneling, recognizing it as a defining material of the era’s warm, minimalist interiors. Instead of covering mahogany/lauan veneers and their distinctive grain, advocates focus on gentle cleaning, color repair, and period-appropriate satin topcoats that revive depth without a plastic shine. The push blends architectural integrity, sustainability (keeping embodied carbon in place), and resale appeal—today’s MCM buyers actively search for homes with original wood paneling intact. Guided by conservation-minded techniques (de-waxing, dye-based toning, thin dewaxed shellac sealers), the movement reframes paneling as heritage fabric to be preserved and celebrated, not “updated” away—protecting the authentic look that made mid-century modern design timeless.
Below is a thorough, step-by-step restoration guide that works for most mid-century modern paneling. Looking for homes with original luan paneling? Check these homes out.
What you’re actually looking at: mahogany, lauan, and true veneer

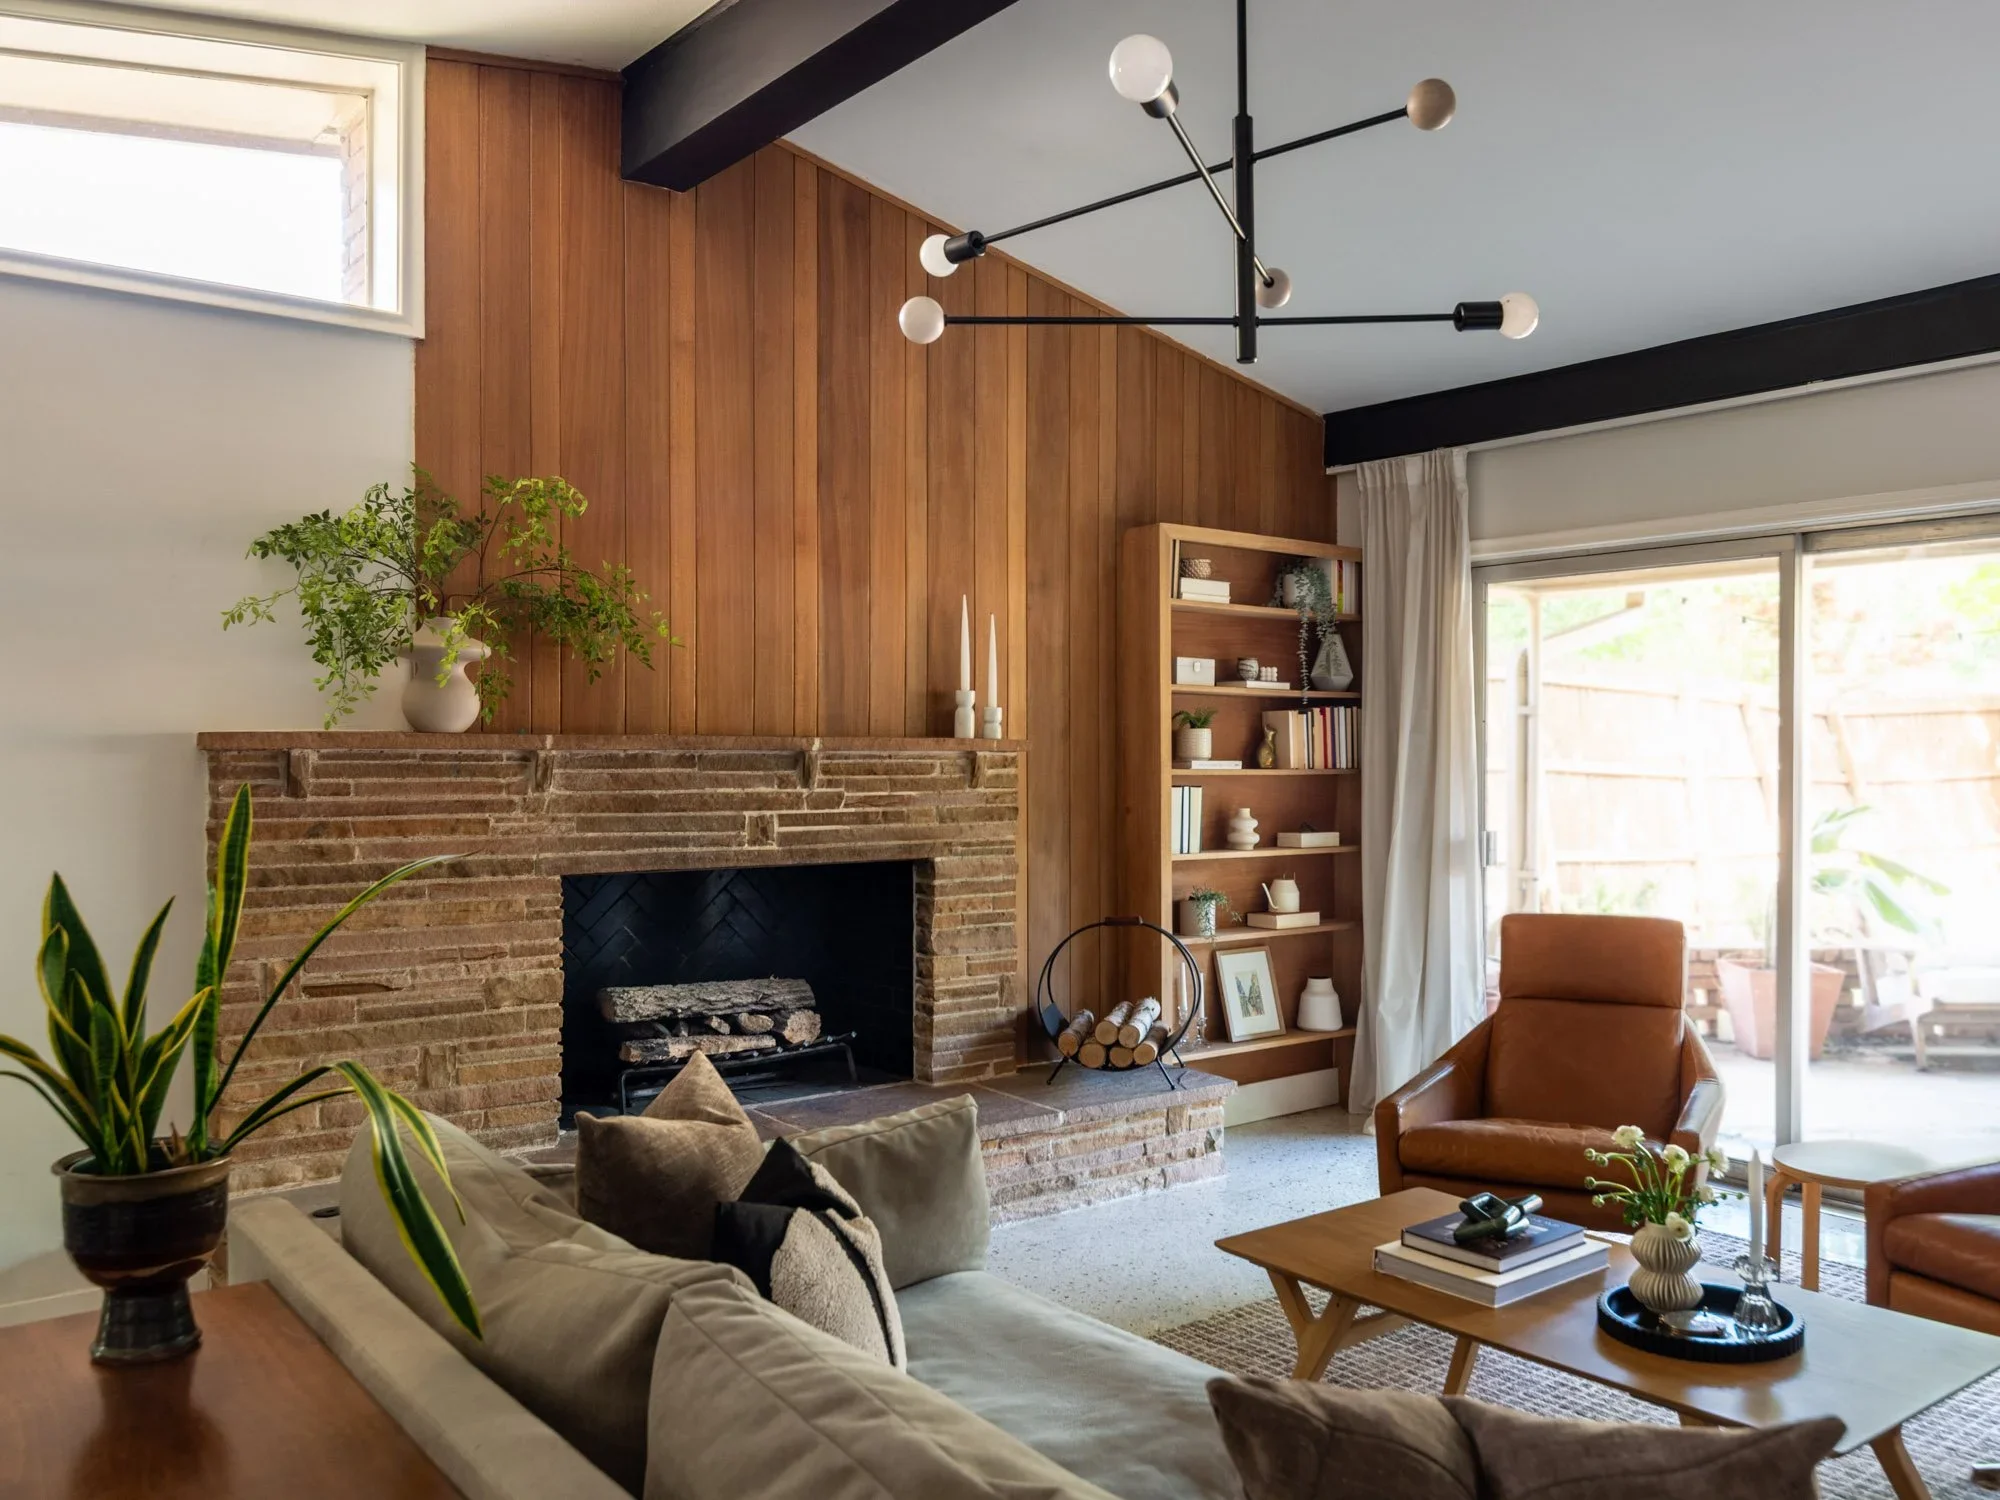
In most mid-century modern homes, the “mahogany” paneling you see is actually lauan/meranti, often marketed as “Philippine mahogany”, a Southeast Asian hardwood, laid up as a thin wood veneer over a plywood core, prized for its straight grain and warm reddish-brown tone. Unlike solid lumber, this veneer is typically only about 1/32"–1/40" thick, which is why aggressive sanding can so easily break through to the substrate and permanently scar the wall. Before any restoration, assume the veneer is thin, treat it gently, and plan techniques—cleaning, de-waxing, careful color repair, and light sealing—that revive the original surface without heavy abrasion, preserving the authentic MCM look. There’s a reason the likes of Charles Goodman, Joseph Eichler, and Nicholas Satterlee embraced natural materials in their designs; They’re timeless, they’re warm, and they just work with mid-century modern architecture. Sure, the aesthetic may not be for everyone, but for any home that still has these original details in good shape, do the world of mid-century modern enthusiasts a favor and preserve them.”
First Ask: keep, refinish, or replace?
Keep & clean if the finish is intact and color is even.
Refinish if it’s dull, scratched, or patchy but veneer is sound.
Replace selectively only where water damage or delamination is severe—and match species, grain, and groove rhythm so walls read as one continuous plane.
Full replacement when the existing paneling is so damaged or discolored it would be impossible to repair or partially replace.
Before you touch a wall: evaluation & testing checklist
Confirm veneer thickness. In an inconspicuous spot (inside a closet), lift a switch plate to see the edge. If you can’t tell, assume ultra-thin.
Identify the existing finish.
If denatured alcohol softens the surface, it’s likely shellac.
If lacquer thinner bites quickly, lacquer.
If neither reacts, you probably have an oil/varnish film.
Check for water damage & delamination. Look for bubbled veneer, dark rings, or lifted edges—these affect the repair plan.
Lighting audit. LED upgrades change color perception. Note your color temperature (CCT): 2700–3000K with high CRI (~90+) fl atters warm woods.
Moisture & HVAC. Target 40–50% RH indoors. Chronic humidity swings cause veneer glue failures.

Credit: Dwell
Step-by-step: how to restore mid-century mahogany paneling (without painting)
Dry cleaning: dust first
Use a soft brush and vacuum with a bristle attachment. Microfiber towels lift grime without grinding it into the grain.
Gentle wet clean (if needed)
Mix a few drops of pH-neutral wood cleaner in warm water. Lightly dampen a cloth, wipe with the grain, and follow immediately with a dry towel. Avoid all-purpose cleaners and anything alkaline (they can dull or haze finishes).
De-wax/de-silicone (the secret step)
Years of furniture polish leave silicone that fights new finishes. Wipe lightly with mineral spirits (good ventilation) to cut wax and oils. Allow to dry thoroughly.
Color and scratch repair
Shallow scratches: Use wax fill sticks or shellac-based touch-up pens matched to the surrounding tone.
Edge chips or missing corners: Feather in a veneer patch (same species/grain direction), glue with wood adhesive, clamp, and level with a card scraper.
Sun-fade or uneven tone: Spot-tone with dyes (more transparent than oil stains). Work light-to-dark; test in a closet first.
Re-amplify the grain (sealer)
For tired, porous veneer, a dewaxed shellac sealer (thin) can re-warm color and lock down old finish contaminants. Use a light hand—remember the veneer thickness.
Choose the right topcoat (the MCM look is glow, not gloss)
Wiping varnish / oil-varnish blend: Easy to apply, yields a soft, period-appropriate satin sheen.
Waterborne clear (water-clear, low yellowing): Great when you want to preserve the current color. Choose satin or matte to avoid a plastic look.
Traditional lacquer (pro application): Delivers the most authentic mid-century sheen but requires skill and ventilation.
Avoid thick, high-gloss poly unless the house originally had it (most did not). The goal is depth and chatoyance, not mirror shine.
Final rub-out
After full cure, a gentle rub with white non-abrasive pads or brown paper can even the sheen. Buff lightly—don’t create heat.
Common mistakes to avoid (and why they ruin MCM walls)
Aggressive sanding. You’ll burn through the veneer and expose core plies.
Heavy gel stains on the wall. They obscure grain and read “1980s.”
Glossy polyurethane everywhere. It looks new but not mid-century.
Skipping the de-wax step. New finishes will fisheye or peel.
Painting out of frustration. You can’t un-paint original veneer.
Why restoring MCM paneling beats painting it
Restoring original mid-century wood paneling—rather than painting—preserves the home’s architectural integrity, keeps the authentic MCM character buyers seek (especially in the DC metro market), and is the more sustainable choice since repair beats replacement and modern low-VOC finishes are available. It also delivers the timeless aesthetic that makes these interiors special: warm mahogany/luan grain, real depth and chatoyance, and a period-correct satin glow that paint can’t replicate.

Lighting your newly finished walls (so they look even better)
Choosing the right lighting is essential for mid-century modern paneled walls because it determines how the wood’s warm reds and browns read—and whether the grain looks flat or beautifully alive. Aim for 2700–3000K, high-CRI (≥90) LEDs so color is accurate and flattering, then use wall-washing or gentle grazing to highlight the vertical grain without glare or hot spots. Avoid cool 4000–5000K lamps that gray out mahogany/luan and make finishes look plastic. Layer ambient light with floor lamps and discreet ceiling washes, and keep fixtures dimmable so the wall’s depth and sheen can shift from daytime bright to evening glow. Proper lighting doesn’t just look better—it preserves the authentic MCM mood and helps any restoration work read correctly.
Ready to revive your mid-century walls?
If you’re in DC, Maryland, or Northern Virginia and considering a mahogany paneling restoration—or weighing whether to paint—let’s talk. I can walk you through options, connect you with the right craft pros, and help you preserve what makes your mid-century modern home so special. If you’re outside the DC area, I would be happy to connect you with an MCM specialist wherever you are; Simply fill out this form to get started.

Search Mid-Century Modern Homes